One of the JSF 2+ nice features presented in Java enterprise edition JavaEE 6+, is that you can pass parameters to any action components action method like commandButton or commandLink components.
Based on that you can minimize the number of methods inside your managed bean.
In addition, to minimize many parameters to set inside the bean to be used by action to decide navigation logic, which reduce memory consumption if your beans in scopes greater than request scope.
How it works:
- Open your favorite IDE, I am going to use Netbeans 7.4.1. (Use any IDE that supports JavaEE 6 or 7).
- Create web project.
File --> New Project --> Java Web (left pan) --> Web Application (right pan) --> Next.
- Name it whatever you like (JSFeatures for me)--> Next --> Server Glassfish4 --> Java EE 7 Web profile --> Context path "/JSFeatures" --> Next.
- From frameworks chose "Java Server Faces" --> Finish.
- You should have project structure like this:
- Right click on the JSFeatures project --> new "JSF Managed Bean". and its name and config like this:
- With the bean opened in the editor page, copy and paste the following code after package statement:
- Open the index.xhtml which is generated by default, and copy the following code and past it in your file:
- Right click on the index.xhtml then --> Run; you should see something like this:
- Click submit button and watch h:outputText value, its value should be "Hi there I am an action method."
- Now everything is working fine. Let us do the actual work I need to demonstrate.
- Change addNumbers() method signature to the following (without restarting the application server):
- Bean method:
- Then your button call to:
- Press the button and output text value should be:
- 13. Do it one more time:
- Bean method:
- Then your button call to:
- Press the button and output text value should be:
Note: the parameter could be with different parameters type not expected to be the same type, also method could return a value for navigation to other pages, in this example it returns null to be on the same page.
I liked this feature too much enjoy it, very helpful and handy, and happy coding.
References:
1- JavaEE 7 tutorial (7.5 Navigation Model).
While I was preparing my database migration script for my project to satisfy specific version requirements, and as usual test it against database before submitting it to QA team. I got the following error with each "CREATE TRIGGER":
It was a very strange behaviour for me, and I contacted my DB team to get help, and logged a support on Oracle Metalink. Because it always works previously on 10g but my new environment is 11g.
It is a bug in oracle 11.2.0.2g and there are bugs logged for this issue:
- Bug 10174125
- Bug 10094416 is fixed in 12.1 release.
Workaround:
At the beginning of my script, I have added the following alter line:
And at the end of the script add the following alter:
In my previous post How to inject Android compiled .apk package into its Device Emulator from the command line. I have demonstrated how to add your compiled .apk file to android emulator, from command line with adb command, included in ADT platform tools.
One of my friends commented:
"Are u really using the emulator.....it is very slow. Even on the fastest machines. I always use a real device."
From this comment, I have made some R&D about this problem, and especially this tools are developed by Google ;), and indeed they know about this symptom.
Also testing on real devices are very costly and time consuming process, as we have a variety of devices varies from multiple screen sizes, which are one of Android developer's worst nightmares. There are a huge number of different screen configurations of Android devices.
The great thing about using an emulator for development is that it gives you an opportunity to develop applications without having a real Android device. The default Android emulator comes together with the Android SDK and can be found in the "tools" folder.
So far so good, we have our coffee, but can we drink it? The answer comes about 5 minutes after we hit the "Launch" button. Go grab a coffee. Have breakfast. Come back. Wait another 5 minutes. Maybe even more.
In meantime, the default Android emulator is notoriously slow. So, what should we do? That is easy - start using a properly fast Android emulator.
Emulation vs. Simulation
If you are using Apple iPhone simulators, you will find that the iPhone simulator does not have the same issue as the Android Emulator.
One of the reasons for this is that it does not run a “real emulator”, because the CPU instruction used by the iPhone simulator is the same as the one used by the host (x86).
On the contrary, Android Emulator emulates a real ARM processor on top of an x86 processor. This is a lot of overhead.
At least for quick test and demonstration purposes, I do not need to emulate an ARM processor; I just need to be able to run Android and my application. The main objective before releasing an application is to find bugs and design imperfections.
Okay, it is slow. Then what can we do about it?
Let us go through steps to solve the slowness problem of Android emulator;
- First, let us delegate the rendering process to host GPU instead of overhead our CPU by this process, it will make it happy. Do it by checking "Use Host GPU" checkbox in AVD's edit window.
The screen should now look better and be more responsive. That is because the CPU is happy to not dealing with the tedious work of doing rendering anymore. However, that is still not fast enough.
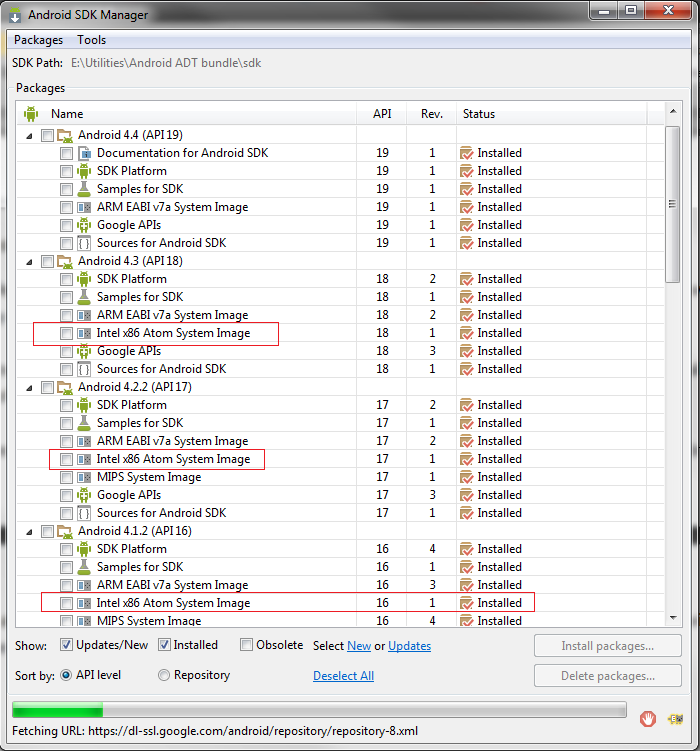
- Second we need to download Intel Atom (x86) system image for each Android version you need to use for testing.
- Third, download Intel x86 Emulator Accelerator (HAXM, for Mac and Windows only). This will enable virtual machine acceleration capabilities of the Intel CPU, from Android SDK manager --> tools. Or install it from Intel site.
- The SDK only copies the Intel HAXM executable on your machine, and it is up to you to install the executable.
To install the Intel HAXM executable, search your hard drive for IntelHaxm.exe (or IntelHAXM.dmg on Mac OS X). If you left everything to default, it should be located at %Android_HOME%\sdk\extras\Intel\Hardware_Accelerated_Execution_Manager\IntelHaxm.exe.
Intel HAXM only works in combination with one of the Intel® Atom™ processor x86 system images.
- In order to be able to install the Intel HAXM, you need to have Intel VT-x enabled in your BIOS, otherwise you will get an error like this during install.
Enabling Intel VT (Virtualization Technology)
How do I enable Intel VT in your machine BIOS?
- Boot into BIOS.
- Select "Config".
- Select "CPU".
- Press enter at "Intel Virtualization Technology".
- Select "Disable".
- Press F10 and select Yes.
- Boot into Windows then shutdown the system.
- Boot into BIOS again.
- Select "Enable" - Intel Virtualization Technology.
- Press F10 and select Yes.
- After installation goes successful, edit your AVD and chose Intel® Atom (x86).
- Finally Hit okay, then lunch your cake and definitely enjoy the speed.
VIP Note:
You could say that this level of speed should be sufficient. That may be true, but an issue with the Intel x86 images is that you do not get Google Apps, they only come with ARM images. This is important if you are testing an app that uses GMaps, or Google Play Services.
I am developing multi-platform (iOS, Android, Windows, and Blackberry) hybrid mobile application for fuel stations finder, I am developing on Adobe Dreamweaver CC, and using Cordova, and PhoneGap tools as well for compilation and final apk, ipa, exe binaries.
I am using Cordova for compiling the mobile application on both windows and Mac. Moreover, I want to test my compiled (.apk) application on Android ADT AVD emulator directly instead of opening ADT eclipse, then run emulator from inside.
Note: my unzipped ADT package on the following path on my machine "E:\Utilities\Android ADT bundle", it may differ on your machine.
If you face a slow Android emulator, please refer to this post "Boost up the Android emulator speed up to 400% on Intel based architecture".
The following are the steps to inject .apk file into the emulator directly to test it:
- Go to "E:\Utilities\Android ADT bundle\sdk", and run SDK Manager.exe, after it opens, choose Tools then manage AVDs.
- On AVD manager click on your android platform, then click start from right panel.
- Based on your machine speed, you should see the emulator up starting Android platform.
- After a while, the platform should be started and ready for usage.
- Click on application menu as illustrated in point 4 image, then app menu should open.
- Under your ADT/SDK folder point to platform-tools folder.
- Create new folder called apps, and copy your appName.apk (in my case Banzenty.apk) into that folder.
Note: Apps folder creation is an optional step, you can past it into the directory directly, but it is for manageability if you have many apps to test.
- Open your command line tool cmd on windows, terminal on Mac, and go to platform-tools.
- With emulator running, run the following command to check that we have the correct device:
if everything is okay you should see the following output
List of devices attached
emulator-5554 device
Otherwise nothing appears just
List of devices attached
- After we checked that we have the following emulator device attached run the following command to inject the app to platform.
If app successfully installed then output will be on console as the following:
212 KB/s (8756736 bytes in 40.265s)
pkg: /data/local/tmp/Banzenty.apk
Success
- And into emulator platform you should find your application installed
- Click on the application and test it:
Happy testing :) Enjoyed it share it.
"What’s new in Java SE, EE, ME, Embedded world & the new Strategy" and "Drive yourself, community with JCP & adopts to professionalism" sessions
I would like to share my successfully Java day story, and my happens by the response of my last event.
I have successfully ran a JCP Kick off session titled "Drive yourself, community with JCP & adopts to professionalism" 2 hours followed by a session titled "What’s new in Java SE, EE, ME, Embedded world & new Strategy" for also 2 hours, last Saturday (30/11/2013) in Cairo University.
What’s new in Java SE, EE, ME, Embedded world & new Strategy;
In this presentation, I have presented the history of Java EE from v1.0 to our latest Java EE 7.0, what is new and a brief introduction to each minor and major change to existing JSRs, and new JSRs with code to show simplifications and enhancements.
Also talked about our future Java EE 8 components alongside JDK 8 with major updates and JSRs, profiling concepts and more.
Lastly, I have explained the IoT concepts with demo. Intro to the importance of Java Embedded systems world. With intro to Raspberry Pi and dukePad.
Drive yourself, community with JCP & adopts to professionalism;
This is an overview presentation about JCP organization, its roles, process, and output. With a detailed explanation of each group role and their output. In addition, to encourage community to participate in JCP, and being valuable members and experience input to the community.
Agenda for both sessions:
http://egjug.org/page/java_ee_7_8_and_beyond
The attendees almost was Professionals, Students, Assistant teachers in Faculty of computer science and Doctors as well.
The main comments I got from all attendees via feedback by the end of sessions, via mails, Facebook, twitter, Google+, and LinkedIn was very positive the information they got also the content. They encourage participating in JCP program that I will lead under EGJUG.
In addition, I got a request to arrange with faculty teacher assistants to hold workshops, in their faculties sponsored by university for their students and assist teachers to get hands on experience on new Java technology as they interested to make it a curriculum in the future semesters of pre-graduate students, so the student can be ready for the market with latest tools.
I really was not except such a response but thanks God it was beyond my expectations.
With the co-operation with EGJUG, I will lead the JCP program, and we have created a participation form, collecting information to be used for participant evaluations to join the Group. And it will be sent with session materials.